Showing posts with label baking. Show all posts

21 June 2011

Rainbow Cake with Chocolate Sour Cream Icing

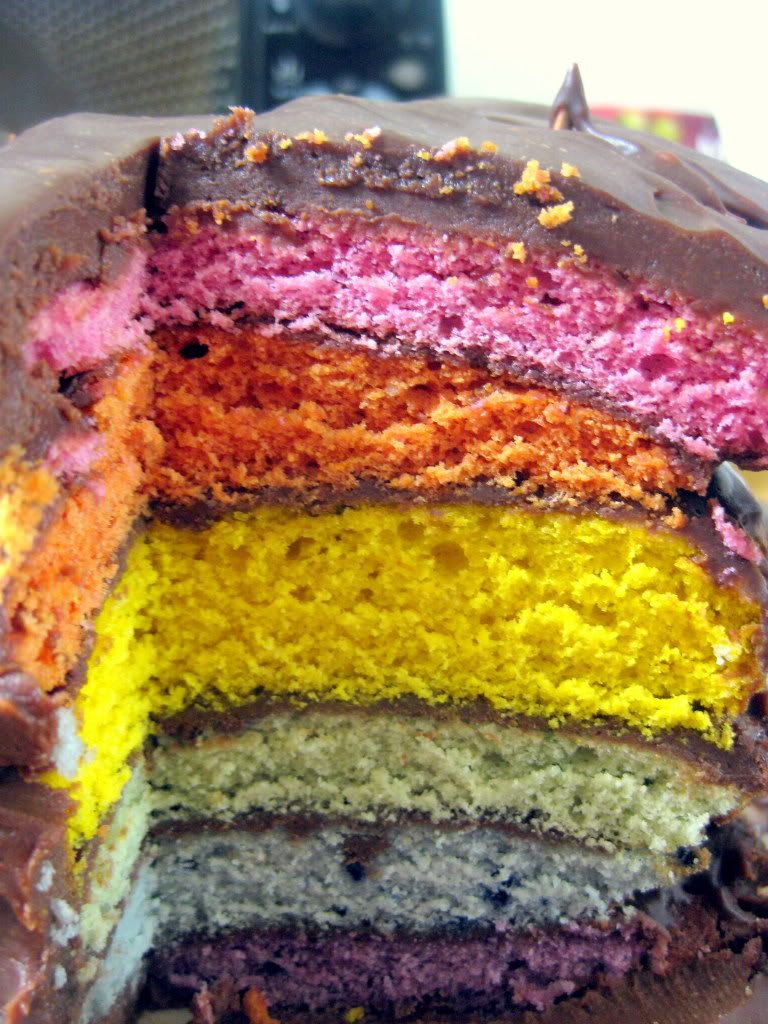
I'm not the best at cake decorating. My birthday cake is all the proof you need of that, although putting the icing on this lemon cake before it had cooled probably shows an equal lack of skill. And this rainbow cake, from this recipe, doesn't look pretty great from the outside. The inside, however, is another story entirely. It's gorgeous. I love it. All you need is normal cake stuff and a bunch of food colouring - plus about a million eggs, particularly if you use the white chocolate buttercream from the original recipe. I had red, green, yellow and blue food colouring, and mixed them to make orange and purple layers too. The red came out pink, and the blue was disappointingly washed out - but seriously, when you look at this cake, that's not what you're thinking.

The icing, incidentally, is delicious and super-chocolatey but not at all cloying. Although you will obviously feel a little unwell if you eat too much of it, the sour cream reins in the sweetness and makes it refreshing. Well, you know. Refreshing for chocolate icing.

This recipe was all done by hand, but feel free to refer to the original recipe if you have a stand mixer.

By the way, if you're thinking "what am I going to do with six egg yolks?", I recommend mixing them with hot drained pasta, mixed herbs, and plenty of cheese. Objectively delicious.

Rainbow Cake with Chocolate Sour Cream Icing
Makes a 6-layer 22x15cm rectangular cake

2 and 1/4 cups flour
1 and 3/4 cups brown sugar
1 and 1/3 tablespoons baking powder
1 teaspoon salt
170g butter (12 tablespoons)
1 cup milk
6 egg whites
1 teaspoon vanilla powder
Red, orange, yellow, green, blue, purple food colouring

1 cup sour cream
1 cup dark chocolate chips
1 cup cream
2 tablespoons butter
80g icing sugar

06 March 2011

White Chocolate Bread

Yesterday I promised you something brilliant. Here it is.

I've been on a baking binge. (Also, somewhat of an alcohol binge the past couple of days. Anyone got any paracetemol?) We've had brownies and lemon cake and even a savoury pie. I've simultaneously been on a white chocolate binge. In the past month, there's been my birthday cake and the white chocolate jaffa cupcakes, a small number of which are still sitting in the fridge waiting to be eaten. It shouldn't be too much longer.

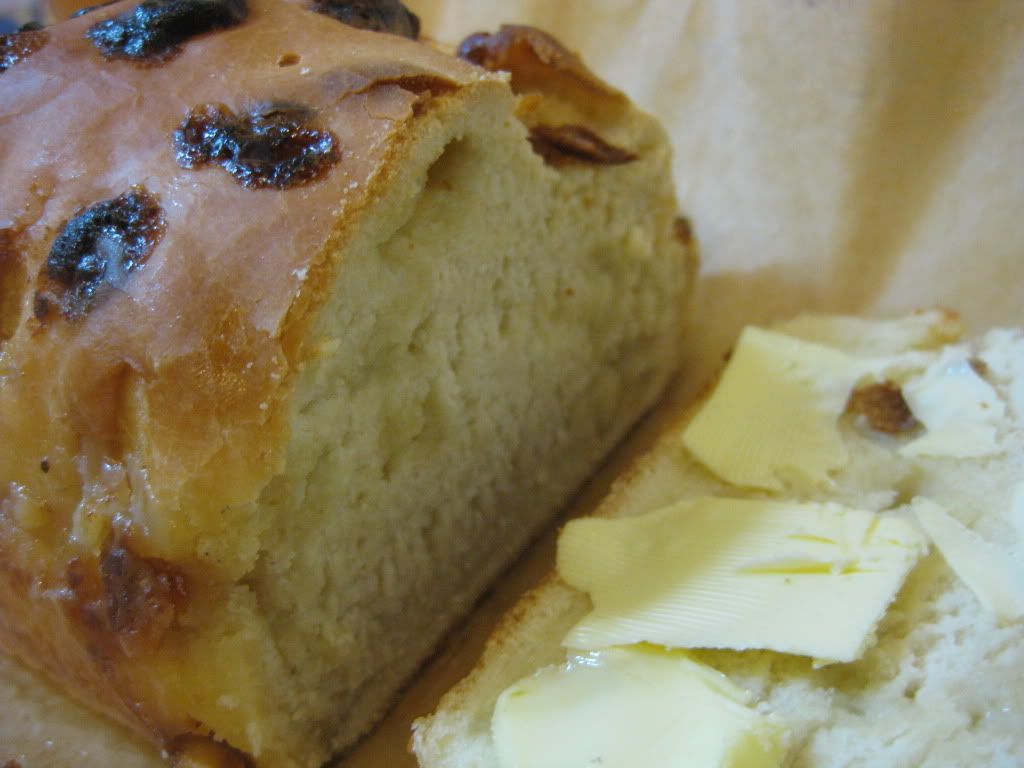
Anyway, it was time to combine these two binges and create white chocolate bread. Yes, really. There's half a loaf sitting on the counter and another loaf, unbaked, slowly rising in the fridge. I even had a warm slice with butter yesterday. The bread is chewy with a hard crust and - well, it's real bread! Not 'it's bread, but not as we know it' which I made a few months ago and was heavy enough to kill someone. I made it by hand, and kneaded for a very long time (about 45 minutes per loaf) to try and get as much air into it as possible. I put Bridget Jones' Diary on and kneaded for the whole hour-and-a-half. And I don't regret it.


White Chocolate Bread
Makes 2 small loaves

4 cups flour
4g yeast
1.5 teaspoons gluten
2 cups water
1 teaspoon salt
1 cup white chocolate chips
Parchment paper

01 March 2011

Salted Fudge Brownies

I've been desperately trying to post this for the last 24 hours but have had trouble uploading photos to Blogspot. The blog's link might change over the next few days because of this, but I'll warn you first.

I'd never heard of Lindt's dark chocolate bar with a hint of sea salt, but a few times over the last week it has popped up in my life on various websites. So when I came across this recipe for salted fudge brownies, the ingredients for which were sitting happily and variously in my fridge and pantry, I thought I would bake that dark chocolate bar with a hint of sea salt right out of my life.

I loved the glossy dark chocolate and melted butter mixture, so much so that I took picture after picture of it. Tom and I both were wary of the long refrigerating time, but after leaving them to cool all day - oh my god, they were better than they were warm. Such good brownies. I'm tempted to just keep on eating them until they suddenly disappear.

Salted Fudge Brownies
Fills a 20cm square pan: 12-16 brownies

1 cup butter
75g dark chocolate
1/2 cup cocoa powder
1 cup sugar
3 eggs
1.5 teaspoons vanilla
1 cup flour
1 teaspoon sea salt

28 February 2011

Fidget Pie

I read about this ages ago under 'Bacon and Apple' in Niki Segnit's The Flavour Thesaurus. And eventually, this weekend, I got around to making it, with recipes adapted from here and here. It was good - usually I associate savoury pies with a dark, heavy filling, but this was surprisingly light. I would say definitely one to make again.

Regarding the stock: I went for 100ml homemade chicken stock with 50ml grape and apple juice, leftover from the making of the rustic grape butter. I recommend a similar mix of stock and cider, or wine - whatever you have to hand.

Fidget Pie
Serves 2-4, depending how hungry you are

For the pastry:
1 cup flour
1/2 cup butter
1/8 teaspoon salt
Up to 3 tablespoons water
1 tablespoon milk

For the filling:
1 tablespoon butter
1 onion
1 apple
3 potatoes
1 tablespoon flour
10 rashers bacon
1 tablespoon mixed herbs
1 teaspoon cinnamon
150ml liquid stock (see note above)
A few small pats of butter
Seasoning

26 February 2011

White Chocolate Jaffa Cupcakes

Only a week has passed and already I've cooked my second 'fortnight cake'! Strictly speaking I made cupcakes, not cakes, but I'm going to use the label anyway.

The icing wasn't as stiff as I'd hoped, even after cooling in the fridge and whizzing in the blender, so I just kind of drizzled it over the cakes - as you can see in the picture. It was highly disappointing as I'd bought a cake decorating kit especially for this recipe, but happily it didn't impact the taste. Which is as phenomenal as the reviews on the original recipe suggested. It is a perfect mixture of cloying and fresh, and surprisingly, one of the bite-sized, teeny tiny cupcakes that my silicone cupcake tray makes could be enough. Don't hold me to that, though.

I used Jaffa oranges for this, just so I could name the final result "jaffa cupcakes." I don't think the brand of orange matters too much, though.

White Chocolate Jaffa Cupcakes
Make about 40 small cupcakes

For the sponge:
3/4 cup butter
1 cup brown sugar
Zest and juice of 2 oranges
4 eggs, separated
1 cup flour
1 teaspoon baking powder
80g almonds

For the icing:
200g white chocolate
250ml cream, separated
Zest of 1 orange

20 February 2011

Butter Lemon Cake with Ginger Beer Icing

We've been a little lemon-obsessed here recently. Only a couple of nights ago we ate lemon and mushroom carbonara, and my 100th post meal was chicken with a lemon-basil sauced pasta. When Tom washed up this morning, he smelled the leftover lemon juice and declared that he wanted a lemon cake. Given that a couple of weeks ago I vowed to make cake fortnightly (and then completely forgot about it), this seemed like a good cake to start with.

Thin, subtle and buttery, with a completely-unintentional crispy bottom (and an icing disaster which turned out to be not-so-catastrophic after all), I could eat a lot of this cake in one sitting. It's not horrifically sugary or lemony, and there's a very slight tang from the ginger beer spice-mix. The spice mix, incidentally, is one my mother bought at Habitat and sent me. The ingredients list is "ginger, sugar, cream of tartar," so I imagine a tiny bit of ginger and cream of tartar would be the non-pre-bought-mix equivalent.

This isn't strictly an original recipe of mine, but I did have a very specific list of ingredients in my head  - coconut milk, butter, eggs, fresh lemon - which didn't match any recipe I could find. Hence the following is a hodgepodge.

Butter Lemon Cake with Ginger Beer Icing
Makes 1 20cm square cake

For the sponge:
1 cup butter
1.5 cups brown sugar
4 eggs, separated
1 cup flour
1 teaspoon baking powder
1 cup coconut milk
1 lemon

For the icing:
1/2 cup butter
80g icing sugar
1 teaspoon ginger beer spice mix
1/2 lemon
2 tablespoons cream

10 February 2011

Birthday: The Cake!

Is it bad that I had to make my own birthday cake?

That's an exaggeration - I didn't have to. Tom offered, but I declined. My 21st birthday cake had to be good (no offence, Tom!), and given that I'm not particularly passionate about any kind of cake (except cheesecake), my recipe was going to have to be special somehow.

I combined a strawberry sponge cake recipe with a white chocolate ganache and a few ideas of my own. Some of those never came to fruition - I wanted a narrow, tall, three-layer cake, but ended up with a wide flat one instead, but oh well - and the final cake was awesome. My last three birthday cakes have been provided by a very good friend who invariably went overboard on the frosting, and I'm glad to announce that this is a tradition I have carried on.

White Chocolate and Strawberry Birthday Cake
Makes a 2 layer, 20cm cake with excess frosting

For the sponge:
1 cup butter
1 cup sugar
2 eggs
1 cup flour
3 teaspoons baking powder

For the filling:
2 cups frozen strawberries
1 cup strawberry jam

For the frosting:
340g white chocolate chips
2 and 3/4 cups cream, separated
1 and 1/2 teaspoons vanilla

19 January 2011

Breakfast Drop Biscuits

Good morning, everyone. In case you haven't noticed, this is the third (count it - third) recipe I've published this morning. Scroll down to see Chicken Nuggets and Easy Biscuit Chicken Potato Pie. I thoroughly recommend the latter, particularly for experimentation with other fillings.

Anyway. I really enjoyed the biscuits on top of last night's pie, so I decided to make some more this morning and have them with jam and butter and just a splash of cream. It was pretty good. I mixed up the recipe (forgetting to add oil, because I am quite simple), dropped the biscuits on to a greased baking sheet, put them in the oven for twelve minutes, showered, came out of the shower to hear the "ding!" of the oven timer, dressed (admittedly, back into pyjamas) while they cooled, and had breakfast. Yum.

So if anyone fancies warm home-made rolls for breakfast, this truly is the easiest of recipes. You just fork a very short list of ingredients together, pop them in the oven, and you're done. These biscuits are called 'drop biscuits' in America for the precise reason that you don't have to knead, or roll, or even flour your own hands. Your hands can stay perfectly clean throughout. Having a dishwasher, so you don't have to clean the dough bowl after, might make them even more tempting.

Breakfast Drop Biscuits
Makes 4 decent-sized biscuits

2 cups flour
1 cup + 1 tablespoon milk
1 tablespoon brown sugar
2 teaspoons baking powder
1 teaspoon lemon vinegar

To serve:
Jam
Butter
Cream
And so on...

In a large bowl, mix the flour, milk, sugar, baking powder and vinegar. Oil a baking tray and drop the dough on to it in four separate clumps - they will rise and spread so don't put them too close to each other.

Bake at 180 degrees (360 Fahrenheit) for twelve to fifteen minutes until golden. Remove, allow to cool for a minute or so, then tear them apart and spread liberally with your choice of topping. Add bacon and maple syrup, for example, to extend the American theme. (Mmmm.)


Biscuit Chicken Potato Pie

Last night I thought I would have a go at recreating the Gallimaufry Pie, which was my fiftieth post on this blog - this post, incidentally, is (I think) my ninety-fourth, so we're nearly at the 100 mark! Very exciting.

Anyway, I wanted to use up some chicken, as well as the cream we bought yesterday, and I completely forgot to add the bacon, and we don't have any sweet potato anyway, so this pie is actually quite far removed from the original Gallimaufry. Hence the far less imaginative name.

It's a good pie nonetheless - I love the easy biscuit topping. (In fact, I loved it so much I made it again this morning. More details on that coming up.) It was tangy and sweet and salty and crunchy and creamy and gorgeous. What's more, it could easily be adapted to suit your particular tastes on any given night: add more potato, or some sweet potato, for a heavier meal, or courgettes for a lighter one. In fact, add whatever you bloody well like. I bet the bacon would be good in it as well.

That said, it is a bit of a frantic meal - in my small kitchen, with no help (during all the parts when I could have used a hand, Tom was conveniently either still out or on the toilet), I felt a bit overwhelmed at times. If you have time, this recipe can be done calmly and still be ready within, say, 80 minutes. As long as nothing burns, everything is perfectly happy to stay on the heat as long as you need it to.

Easy Biscuit Chicken Potato Pie
Serves 4 with a side

2 large onions
2 garlic cloves
1 large chilli
2 chicken breasts
Chilli powder
3 small potatoes
1/2 glass white wine
100ml cream
1 bell pepper
1 tablespoon balsamic vinegar
1/2 tablespoon brown sugar
1/2 cup mayonnaise
1 tablespoon lime juice
1 teaspoon mustard
Seasoning

Dough:
2 cups flour
1 cup milk
2 teaspoons baking powder
1 teaspoon lemon vinegar
2 tablespoons oil
1 tablespoon of milk, separate

Finely dice one of the onions, both garlic cloves and the chilli. Chop the chicken breasts into chunks, sprinkle these ingredients with chilli powder, and fry in a large pan on a low heat.

Chop the potatoes (peeling first if you want) into chunks roughly the same size as the chicken chunks, and boil for about ten minutes.

Add the white wine to the chicken pan and turn the heat up, allowing the alcohol to burn off. Once the potatoes are ready, drain and add them to the chicken pan, along with 100ml cream (or slightly more if that looks too dry). Chop the bell pepper chunkily and add it to the pan. Turn the heat down to its lowest possible setting, and season. Add more chilli powder to taste.

Quickly mix the flour, milk, baking powder, vinegar and oil in a bowl. The mixture should be thick and sticky and difficult to stir.

Rinse out the potato pan and dry it. Heat some oil in the pan while you finely slice the second onion in half and then into crescent-moon shapes, and then dump into the pan. Stir. Once the onions are fairly soft, add the sugar and balsamic vinegar and stir to coat. Continue cooking this on a low heat, allowing the onions to soak up the balsamic flavour, while you prepare the mayonnaise mixture.

Mix the mayonnaise, lime juice and mustard in a small bowl and whisk.

Now it's time to assemble the pie!
Spread half of the chicken potato mixture on the bottom of your oven-proof dish. Pile half the caramelized onions on top and dot with half of the mayonnaise mixture. Repeat with the second half of each mixture.


Using a couple of spoons, blob the dough mixture on top of the pie. It's going to look ugly, but don't worry. You're meant to be able to see the pie filling underneath the various biscuit blobs. Brush each bit of dough with the tablespoon of milk you kept separate.


Put in the oven at 180 degrees (360 Fahrenheit) for twenty-five minutes. Serve.

15 January 2011

Flammkuchen

Tom's favourite meal in Germany - a huge thin slab of pastry topped with cream, bacon and onions. And yet it took me a Smitten Kitchen post on Flammkuchen (or one of its many other names) to consider recreating it in Korea. Thankfully it was an easy Friday night meal, especially as I point-blank refused to make the dough (my [rejected] idea was making pancakes, topping them with the usual Flammkuchen toppings, and baking them briefly), and Tom stepped up to take my place. He used the nice, easy recipe here, and didn't clean up the counter after himself. (Not that I'm bitter about it.) The toppings were my domain; I had to substitute and make buttermilk rather than sour cream, but it still tasted pretty damn good.

A quick note: you'd assume, if you'd not eaten Flammkuchen before, you might assume that one 'pizza' per person might be enough. Well - you'd be wrong. It's very more-ish, and the thinness of the base makes it feel virtuous enough that you could easily have a second. And a third.

Flammkuchen
(Printable Recipe)
Makes 2

Dough:
2 cups flour
2 1/2 tablespoons oil
2/3 cup water
Pinch of salt

Toppings:
500ml milk with 1 tablespoon lemon vinegar
or 1/2 to 1 cup ricotta
250ml milk with 1 tablespoon lemon vinegar
or 1/2 to 1 cup sour cream
1 clove garlic
1 large onion
10 rashers bacon
Seasoning

Mix the dough ingredients together. Divide into two and roll each out as thinly and widely as possible to make the Flammkuchen base. (Make sure it'll still fit in your oven.) Oil two baking sheets and place one under each base.

Prepare the buttermilk/sour-cream-substitute by mixing the 250ml milk with 1 tablespoon of lemon vinegar, stirring, and allowing to curdle.

Make the ricotta by mixing 500ml milk with 1 tablespoon of lemon vinegar in a pan and setting on a low heat. Stir occasionally.


After a few minutes, the curds will start to pull away from the side of the pan like this.


Within ten minutes the milk will look like this. Prepare a colander by lining it with folded cheesecloth (or an old tablerunner folded in four, like me) and pour the mixture through. Allow to sit for five minutes before using the ricotta.

Finely chop the garlic and mix with the ricotta and buttermilk, in a blender if you want to make it really smooth. Season and spread half of the mixture on to each pastry base.


Cut the onion in half, and finely slice each half into crescent moons. Put in a heavily oiled pan and let them soften over a low heat. Chop the ten rashers of bacon into thin matchsticks and add to the onion pan until they are semi-cooked, and the onions are caramelizing a little.


Spread half of the onion and bacon mixture on to each Flammkuche and bake on the middle shelf of the oven at 220 degrees (430 Fahrenheit) for fifteen minutes, turning halfway if necessary.


It's ready once the toppings are slightly browned. Serve, and eat with a knife and fork unless you feel like you can balance that paper-thin crust on your fingers.


09 January 2011

Chicken & Onion Clove Baguette

On Thursday I read the "Onion and Clove" part of Niki Segnit's Flavour Thesaurus, and loved the idea of slow-frying onions with a hint of clove and piling them in a baguette with slices of roasted chicken. From there hatched a three-day wait and a plan to make French bread from scratch.

I followed the ingredients exactly, but I wonder if there's something different about Korean yeast vs. Western yeast. My bread was slightly heavy, tragically, but I can't figure out why that would have happened. Sorry that I can't offer any more pointers! It was still delicious. The onion, clove, chicken and bacon mixture had an amazing subtle flavour to it, although I was surprised that it lacked richness. I added mayonnaise to my sandwich. I think that if you added cream rather than milk to the onion mixture, that might solve it.

Original bread recipe is a video.

Baguettes
(Printable Recipe)
Makes 2 small loaves

4 cups flour, divided
2 pinches of salt
1 tablespoon yeast
2 cups warm water
1 beaten egg or 1/2 cup water
1 oven-proof bowl half-full of boiling water

Dissolve the yeast in the water and add two cups of flour with one pinch of salt. Mix with your hands to form a sticky dough. Cover and leave to rise at room temperature for three hours.

Before rising.

After rising.
Work the extra two cups of flour and another pinch of salt into the dough, and knead for ten minutes. The dough should become very elastic. Shape it into a ball and leave to rise for another hour.


After the hour has passed, divide the dough into two and knead each half for a few minutes before rolling into a baguette-shaped log. My oven is tiny so I made the baguettes quite thick and small. You could also make two thin, full-length loaves with this dough if your oven is big enough.


Let the baguettes rise for another half hour.

Make four slashes on the top of each baguette and brush lightly with egg wash or water. Heat the oven to 250 degrees (480 Fahrenheit) and put the bowl of boiling water on the lowest shelf. Heavily grease some baking paper and sprinkle with a little more flour. Place the baguettes on the baking paper and put on the middle or highest shelf in the oven for fifteen minutes.

After fifteen minutes, remove the water (carefully! Steam burns!) and turn the temperature down to 220 degrees (430 Fahrenheit). Bake the bread for a further twenty-five minutes before turning it over and baking with the bottom side uppermost for another five. Let the bread cool slightly and eat.


Chicken & Onion Clove Filling
(Printable Recipe)
Serves 2, or 4 with a side

3 chicken breasts
3 rashers of bacon
Herbs
Seasoning

2 onions
1 tablespoon butter
Oil
1 scant teaspoon of ground cloves
1 tablespoon white wine
1 tablespoon milk
Lime or lemon juice
Seasoning

Slice the chicken breasts lengthways in half through the middle, as if to make a sandwich, and place a rasher of bacon in each cavity. Put the top half of the chicken back on. Cover the chicken with herbs and a little bit of clove spice, season, and bake at 200 degrees (390 Fahrenheit) for twenty five minutes.


In the meantime, melt the butter with some oil in a pan and thinly slice your onions into half-moons. Fry the onions on a very low heat in the butter and oil with the teaspoon of ground cloves, stirring regularly. Once the onions are soft, after ten to fifteen minutes, add the wine and milk (or cream). This will make the mixture just barely into a sauce.


Taste the onions and add a squeeze of lime or lemon juice if necessary.

When everything is cooked, pile the baguettes with onions and lay carved chicken slices on top. Cut the baguette in half and serve - either one baguette per person, or half a baguette per person with a salad or some chips, is more than enough.

Drink white wine while you eat. Yum.


05 January 2011

Chocolate-Chilli Cookies with a Hint of Lime

First things first: this is not a recipe.

Oh, at first glance it may look like a recipe, but actually it's not. It's something that I threw together after coming home from yoga feeling hungry and fancying something more than just plain chocolate. I used the dregs from both the flour and sugar packets (I got through an entire kilogram of flour in the past week - something I'm oddly proud of) so have no idea how much any of that was. And I just cut off bits of butter off the stick rather than taking any measurements, so ditto there. Basically, here are some guidelines to making some awesome cookies.

Second: don't use parchment paper. Grease the bottom of a baking tray or something. Otherwise this might happen to you.

Cookies refusing to part from baking paper.
Why yes, I am sitting here eating around the paper on the cookies. And I don't recommend it.

These cookies are delicious and feel very adult, in a way that normal chocolate chip cookies don't. They tease your tongue slightly, and have a great depth to them, while the lime adds just a hint of fruitiness. I love them, despite the fact that they are partly made of paper.

Chocolate-Chilli Cookies with a Hint of Lime
(Printable Recipe)
Makes as many cookies as the recipe you use (13 for me)

Cookie ingredients from your favourite cookie recipe
(I googled "no egg cookies" and came up with this)
70g milk chocolate
1 teaspoon chilli flakes
Lime juice

Make your cookie dough. Bash the chocolate about a bit until it is in chunks, and add it to the dough. I put my chocolate in a plastic bag and hit it with the chilli tub until it was in bits, some of which were still quite large. Yum.


Add the chilli to the dough and stir it through again, trying to distribute it as evenly as possible. Take small bits of the dough and roll into balls before pressing them flat into discs.


Put each disc on a greased baking tray and sprinkle with a couple of drops of lime juice. Bake at 180 degrees (360 Fahrenheit) for twelve minutes.

02 January 2011

Steak and Ale Pie

A dinner! After what feels like weeks (but is actually, oh, two days if you count the tomato sauce post) I have cooked something new that didn't require dough. (Except it did.) I have to admit, though, that already my horrifically bad food photography skills are annoying me. I know it'll be a learning curve, but honestly, can't learning curves happen faster?! Sigh.

I've mentioned before that we bought one and a half kilograms of beef for Christmas Day, and ate very little of it. It finally got finished today, in a steak and ale pie. I used Gordon Ramsay's rough puff pastry recipe for the topping, and my own imagination for the rest. I forgot to add flour, so the pie filling was rather runny, but still pretty damn good; the pastry was delicious and buttery but not particularly flaky. Tom compared it to suet, in a positive way I think.

Steak and Ale Pie

2 cups flour
1 teaspoon salt
1 and 1/2 cups butter
100-150ml cold water

2 onions
3 garlic cloves
About 750g beef
1/2 cup flour
300ml ale
1 tablespoon gravy powder with 1 tablespoon soy sauce
1 teaspoon chilli powder
1 head broccoli
1 egg
Seasoning

Slice the butter into chunks (it shouldn't be softened) and add to the flour and salt. Scrunch the mixture together with clean hands, rubbing your fingers and thumbs together as if to make a crumble topping. After about five minutes of this, make a well in the middle of the dough and add 100ml water. Incorporate the water into the dough, adding the remaining 50ml if necessary. Shape into a ball, wrap in clingfilm, and chill in the fridge for twenty minutes. After this, knead the dough and roll it out. Fold the dough back into a ball and chill it for a further twenty minutes. Repeat this rolling and chilling as many times as you like - the more you do it, the flakier your pastry should be. I rolled and chilled twice before rolling my dough out to the desired size and using it as the pie topping.

Roughly chop 2 onions, and finely chop the garlic. If you are using raw beef, chop the beef too and add all of these to a hot oiled pan. Brown the beef on all sides. I was using already cooked beef so just fried the onion and garlic for now.

Chopped garlic, onion and beef.
Once the beef is browned (or just after the cooked beef is added to the pan), add the flour to the pan and stir so the meat is coated. Mix the gravy powder and soy sauce and add 500ml boiling water. Stir the liquid and pour it into the pan, along with the 300ml ale. Stir the chilli powder into the mixture along with seasoning, and allow to simmer for forty-five minutes. In the meantime, snap the broccoli head into florets.

The pie filling simmering.
Add the broccoli and the mulled wine ice cube (or some red wine) to the stew and cook for a further ten minutes. Pour the stew into a deep pie dish and top with the pastry lid. Score some lines in the lid, and brush with a beaten egg. Bake at 180 degrees (360 Fahrenheit) for thirty to forty minutes, and serve.

Raspberry-Rum Shortbread

It's January and yesterday was the first time that I made Christmas cookies. In fact, throughout December, I made no cookies whatsoever. Sure, the jam-ricotta crescents were called 'crescent cookies' in the original recipe, but they were more like pastries and I made them after Christmas anyway. And there were the chocolate chip pie bars, but they were made with Thanksgiving in mind, not Christmas. (Funnily, I complained about the mess and stress of rolling out dough in that post. In the last five days, I have rolled out no less than four separate doughs, one of them multiple times to make it into puff pastry - a steak and ale pie which will come out of the oven soon - and actually enjoyed doing it. Maybe it's the use of a champagne bottle as a rolling pin.)

Anyway: personally, I blame the knitting - what with deciding to make knitted gifts in November, there was very little time for me to go on cooking adventures. If I ever decide to knit a gift again, I'll have to start at least six months before the due date. That's the plan at least.

So now that Christmas and the time of panicked knitting is over, I am very happy to put my needles aside and head back to the kitchen. Just to add to the oddity of making cookies right after Christmas, I even used our Christmas cookie cutters - only used once before, and that was by Tom who tried to make a fried egg in the shape of a snowman. It didn't work too well, as far as I remember.

The original recipe was for cranberry-rum shortbread from Everybody Likes Sandwiches. The dough was rolled by hand into logs and sliced for cookies, but I felt like more work. Either way is good. I also used frozen rather than dried fruit, which gave the fruit-rum mixture a whole different spin. The original recipe will give you shortbread with cranberries; mine, with its many adaptations, gives you purple, fruity, boozy biscuits.

Raspberry Rum Shortbread
(Printable Recipe)
Makes about 25 biscuits

1 cup of frozen raspberries (or other fruit)
1/2 cup of rum
1 cup butter
1 tablespoon lime juice
1/2 tablespoon vanilla extract
1 cup icing sugar, divided into two 1/2 cups
2 cups flour
1/4 teaspoon salt
1/4 teaspoon baking powder

Put the berries and rum into a pan and heat on the stove until the mixture starts to bubble. Turn off the heat and leave for half an hour.

Raspberries and rum, marinating.
Cream the butter with the lime juice, vanilla, and half a cup of icing sugar. I had had enough of creaming by hand so after five minutes of manic stirring, I squished the ingredients together with clean hands. Add salt and baking powder, and gradually add the flour while stirring, one half-cup at a time. If the mixture gets too thick, add some of the rum (which should now have taken on the colour of the berries) to loosen it slightly. Add the remaining rum and fruit and knead the dough for about five minutes.

The dough, pre-kneading.
Shape the dough either into a ball (if you are going to roll it out later) or into two logs, and refrigerate for at least two hours.

If you have shaped the dough into logs, slice thick circles from the log with a knife and bake in an oven at 180 degrees (360 Fahrenheit) on a greased parchment sheet for thirty minutes.

Alternatively, roll out the dough with more flour and cut out biscuits with cookie cutters.

Cutting out biscuits.
Bake the cookies at 180 degrees (360 Fahrenheit) on a greased parchment sheet for thirty minutes - mine took this long because the biscuits were still very thick. Thinner biscuits will take less time.

Using the remaining half cup of icing sugar, dust the biscuits. Taste first to see if this is necessary: you may find that it isn't.

29 December 2010

Jam-Ricotta Crescents

This was the second baking adventure of the day (see the first here) and it was extremely successful. The dough was easy and the crescents are both delicious and gorgeous. The pastry is delicate, crumbly and slightly shortbread-y and it feels like cheating to make a pastry this light with barely any work. It is savoury (there is no sugar in the recipe) but the jam sweetens it enough. I made about 20 pastries, most with strawberry jam, some with marmalade. I found the marmalade much softer, so it squidged out from the pastry when I wanted it to stay in the pocket (I lost a couple of crescents that way, sadly) - hence I used less, and the marmalade crescents don't taste much of marmalade. Proper jam seems to do a better job.

Given that there isn't any sugar in the recipe, these could be redone as savoury treats. I think they'd be amazing with cream cheese and caramelized onions inside.

The original recipe calls for farmer's cheese but I made ricotta using about 500ml milk. Instructions for both will be included below.

Jam crescents with ricotta pastry
Jam-Ricotta Crescents
(Printable Recipe)
Makes about 22 pastries

1 cup butter
500ml milk with 1 tablespoon lemon vinegar or 1-2 cups ricotta
2 tablespoons cream with 1 teaspoon lemon vinegar or
2 tablespoons sour cream
1/4 teaspoon vanilla
2 cups flour
1/4 teaspoon salt
Jam (I used strawberry jam and marmalade)
2 tablespoons milk

Soften the butter - I took mine out of the fridge while I was working on the bagel dough, then chopped it into large-ish chunks and microwaved on a low heat for ten seconds. Cream the butter, either with an electric mixer or by hand. If you are creaming by hand, it is best to hold the bowl against your torso rather than leaning over a table. This should take about ten minutes.

In the meantime, pour the milk into a pan and add one tablespoon of vinegar. Leave to curdle for one minute before turning the heat on (low). Stir every so often. After ten minutes the curds and whey will have separated - pour the pan's contents through a colander lined with cloth (as shown below, and as discussed before here). Leave to drip for five minutes. Alternately, skip this entire paragraph and use bought ricotta.

Fresh ricotta
In a separate cup, mix two tablespoons of cream with one teaspoon of vinegar to make sour cream. Allow to stand for a minute to curdle. Alternatively, use two tablespoons of sour cream.

Mix the creamed butter with the ricotta, sour cream and vanilla and stir everything through. Add the flour and salt. At this point I found that I needed to use my hands to shape the dough as it was just separating into small shaggy bits - I buttered my hands lightly and kneaded the dough in its bowl until it came together, which didn't take long. Shape the dough into a ball, wrap in plastic, and chill for at least three hours. My dough went in the fridge for two and a half hours, became rock-hard, and then sat on the counter for another hour and a half before I was ready to start on the next step.

Wrapped and ready to go in the fridge
Once the dough has been chilled, remove the plastic and roll it out on a lightly floured surface.

I only use the best equipment
I rolled the dough until it was about half a centimetre thick. Use a knife or a square cookie cutter to cut squares from the pastry - the closer to perfect the squares are, of course, the better, but getting the ruler out was a step too far for me. Fill each square with a scant half-teaspoon of jam, fold in half into a triangle, and press firmly on the edges to seal the pastry. Roll the right-angled corner over the hypotenuse of the triangle, and twist the ends into a crescent shape. Place on a greased baking tray.

Re-roll the dough scraps and continue cutting squares of pastry until all the dough has been used. Pour the two tablespoons of milk into a bowl and using either a pastry brush or clean fingers, daub each crescent with milk. (An egg wash could also be used here.)

Put the crescents in the oven at 200 degrees (390 Fahrenheit) for ten to fifteen minutes. Oddly, my jam crescents were done after ten, whereas some of the marmalade ones were barely browned after fifteen.

Fresh out of the oven

The original recipe recommends dusting the baked pastries with icing sugar but I skipped this step as I didn't feel it was necessary.

Bagels

It's half past three here in Korea, and only now are both of us up and dressed.

Today is the first day of our five-day holiday, so naturally we didn't wake up until 11:30. Somehow I decided that baking was more important than showering, or dressing, or brushing my teeth, so two separate batches of dough were made before I did anything to make myself presentable. Or clean. Now I'm really cooking in pink pyjamas (and extra thanks to my parents, because the pyjamas have half-length sleeves so I'm not constantly pushing them out of the way to stop flour from getting on them).

I had found a bagel recipe yesterday and already decided to make it today; when I woke up, I saw a recipe for crescent jam and cheese cookies and immediately added that to my list. The recipe for the cookies will come later today, because the dough is still chilling and I need to go out and buy square cookie cutters anyway. On a barely related note, I also need to cast on a new knitting project today, because tomorrow we're going on a road trip, and I'll need something to do with my hands!

Anyway. Bagels.


Bagels
(Printable Recipe)
Makes 8-12 bagels (depending on size)

8g instant yeast
4 tablespoons brown sugar, divided
300ml warm water, divided
2 teaspoons salt
3 cups flour

Empty the yeast sachets into a large bowl with one tablespoon of the sugar. Put the kettle on but turn it off before the water reaches boiling point. Pour 100ml of the warm water over the yeast and sugar, and leave for ten minutes. (The original recipe says to leave it until the mixture becomes frothy, but mine never developed more than one or two bubbles.)

A very unfrothy mixture.

Pour the remaining 200ml warm water into the bowl, reheating it beforehand in the kettle. Add the salt and 2 cups of flour, stirring everything through. I needed to add one more cup of flour to make the mixture into a firm dough, you may need more or less.

Turn on to a lightly floured surface and knead for ten minutes until the dough is stretchy and elastic. Gently coat the dough and the inside of a bowl with oil, and put the dough in the bowl to rise. Cover with plastic.

Leave to rise for an hour.
It doesn't look much bigger, but that's just because the camera was further away. Honestly.

After an hour, pull off small handfuls of the dough and shape them into slightly flattened balls. Using the handle of a wooden spoon, poke holes in the centre, and with your fingers make the hole bigger by spinning the dough slowly around the handle. Make 8 larger bagels, 10 medium bagels, or 12 small bagels this way.

Don't worry if they come out a little misshapen.
Boil a pan full of water and add the remaining three tablespoons of sugar to the pan. Stir to dissolve. After boiling, the bagels will be baked, so grease either some parchment paper or just your baking tray with butter. I forgot until halfway through the cooking time, when I pulled bagels off paper and quickly greased it. That wasn't much fun, so grease now.

 Using a slotted spoon, boil each bagel for a couple of minutes, turning them in the water. When they come out, they should be slimy to touch. Drain as well as possible (it doesn't matter if a little water gets on to the paper) and put the boiled bagels straight on to the baking tray. I recommend not boiling more than three at a time, but it depends on the size of your pan.

Boiling.
Bake at 200 degrees C (390 Fahrenheit) for twenty minutes.

Delicious with butter.